It is not recommended to install Windows 11 on VirtualBox for a non-supported kernel. The kernel is the core component of an operating system, and it is responsible for managing the communication between the hardware and software. If the kernel is not compatible with Windows 11, it is likely that the operating system will not function properly and may cause stability issues.
Here are the general steps for installing Windows 11 Pro on VirtualBox:
1. Download and install VirtualBox on your computer from the official website https://www.virtualbox.org/wiki/Downloads
2. Download the Windows 11 ISO file from the Microsoft website (https://www.microsoft.com/en-us/windows/windows-11)
Download Windows 11
To get started you first need a license to install Windows 11 or have a Windows 10 device that qualifies for an upgrade to Windows 11. Make sure you have: An internet connection (internet service provider fees may apply). Sufficient data storage available on the computer, USB, or external drive you are downloading the .iso file to.
3. Open VirtualBox and click on the "New" button to create a new virtual machine.
4. Give the virtual machine a name (e.g. "Windows 11") and select "Windows" as the type and "Windows 11" as the version.
5. Set the amount of RAM and hard disk space you want to allocate to the virtual machine. It is recommended to use at least 4 GB of RAM and 20 GB of hard disk space.
6. Click on "create a Virtual hard disk now".
7. Select the Hard disk file type to VDI (VirtualBox Disk Image).
8. Select "Dynamically Allocated" storage on Physical Hard Disk.
9. In the File location and size section, type the name of the new virtual hard disk file and also select the size of the virtual hard disk.
10. Click on Setting then click on storage. In the "Storage" section, click on the empty CD icon and then click on the "Choose Virtual Optical Disk File" button.
11. Navigate to the Windows 11 ISO file you downloaded and select it.
12. Start the virtual machine and follow the prompts to install Windows 11.
13. Once we click on "Start", it will automatically boot to the on-screen instruction:
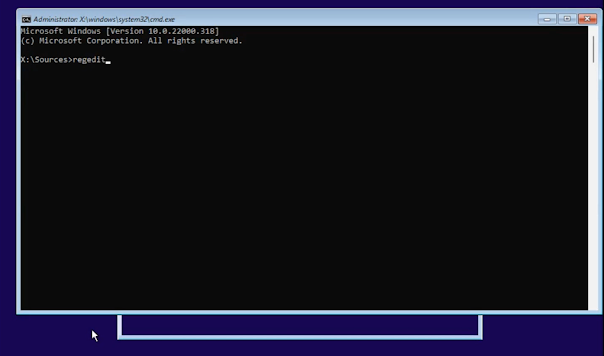
14. Open windows Command Prompt by pressing Shift + F10. and then type regedit, then select Registry Editor (Desktop app) from the results.
.png)
15. Change File Path to Computer\HKEY_LOCAL_MACHINE\SYSTEM\Setup
16. Right-click on Setup, click on New and then click on Key.
17. type LabConfig.
18. On Right Panel, Right-click on the mouse, and click on New → DWORD (32-bit) Value.
19. Rename to BypassTPMCheck.
20. Change the value 1.
21. Again, on Right Panel, Right-click on the mouse, and click on New → DWORD (32-bit) Value.
22. Rename to BypassSecureBootCheck.
23. Change the value 1.
Install/Upgrade windows 11 on non supported Kernel
It is not recommended to install on a non-supported kernel. The kernel is the core component of an operating system, and it is responsible for managing the communication between the hardware and software. If the kernel is not compatible with Windows 11, it is likely that the operating system will not function properly and may cause stability issues.
25. Once the installation is complete, you can use the virtual machine to run Windows 11 as if it were installed on your computer.
26. Remember to install the VirtualBox extension pack, and guest additions and configure the network settings according to your host machine.
27. Follow the installation setup:
28. Reboot your computer, and you will find out compatible screen:
Note: It is important to check the VirtualBox and Windows 11 System Requirements.


.png)
.png)
.png)
.png)
.png)
.png)
.png)
.png)
.png)
.png)
.png)
.png)
.png)
.png)
.png)
.png)
.png)
.png)
.png)
.png)
.png)
.png)
.png)
.png)

